It’s no secret that PixInsight is very powerful, possibly even THE VERY BEST post-processing software for astrophotography. Yet many people, especially beginners, can be put off by it as it doesn’t feel as intuitive as other software, and the sheer scale and complexity of PixInsight means that people often don’t know where to begin.
That’s where this post comes in! I have developed what I think is the EASIEST workflow for beginners in PixInsight. Trust me, you don’t need to be an expert here. You don’t even need to have ever touched PixInsight! Below is a video I created on my YouTube channel when using PixInsight for the first time.
All I had done is watch a few tutorials and made some notes just to prove that if I can do it, anyone can! Since making that video, I have made some tweaks to my workflow in PixInsight, which I detail below.
Post-Processing Preparation
Before we start processing our image, I need to explain a couple of things.
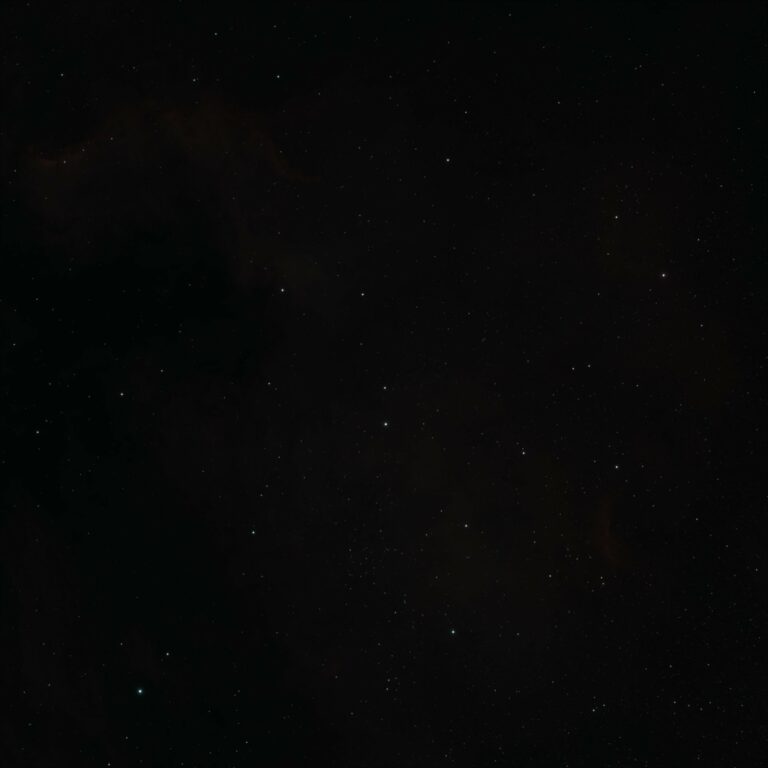
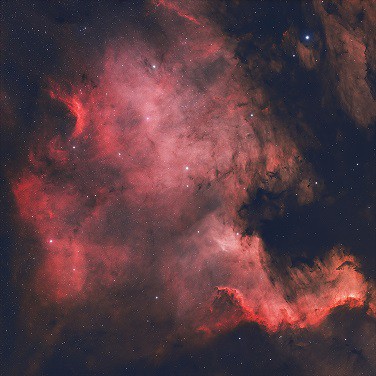
- This workflow assumes that you have a stacked TIFF file to begin processing. This can either be one from your own imaging session, or if you follow the video at the bottom of this page, then I actually make some of my own data from the North America Nebula available for free so you can practice along. If you still need to stack your images but aren’t sure how, I have a DeepSkyStacker guide you can follow.
- In this tutorial I use a script that is part of the EZ Processing Suite in PixInsight. If you want to use it, then you can download it for free here. Alternatively, you can use TGV Denoise which is pre-installed in PixInsight.
- To apply any process to your image in PixInsight, you need to drag the triangle from the process over to your image. That saves me repeating it for every step!
- All processes can be easily found under the Process -> All Processes menu, with the exception of EZ Denoise, which is found under the Scripts menu.
Okay, now that’s out the way, let’s get into it.
The Workflow
Here we’re only going to use some basic processes within PixInsight, but as you’ll see below, even a basic workflow can yield excellent results.
The processes that we will use are:
- Screen Transfer Function (STF)
- Background Neutralization
- Color Calibration
- SCNR
- Histogram Transformation
- Dynamic Background Extraction
- Starnet
- Curves Transformation
- EZ Denoise
- Pixel Math
- Morphological Transformation
- Unsharp Mask
That may seem like a long list and look quite complicated, but depending on the speed of your PC, you could process an image using this method in about 10 minutes once you’ve got the hang of it.
If you prefer to follow along with a video, then the above video goes through this process step-by-step, and even comes with free data to get you started.
Step 1. Screen Transfer Function – This is your best friend in PixInsight. This little button will take a stacked TIFF file and do an initial curve stretch. It’s a great feeling clicking on that little button and seeing the fruits of your labour! Note that STF doesn’t apply the stretch to your image, we will do that in step 5 but keep STF open until then as we will need it later.
Step 2. Background Neutralization – This process will do exactly as it’s called, neutralise the background. Overall it should make the background a little darker and provide more of a contrast between your deep sky object and the background. I leave the settings for this as default but you may need to adjust the sliders depending on your image quality.
Note: To run processes in PixInsight, you need to drag the triangle in the bottom left corner and drop it onto your image – see what I mean about it not being very intuitive?!
Step 3. Color Calibration – This will adjust the colours of your image to something a little more natural. Again, you may need to adjust the upper and lower limit sliders. You don’t want to lose any detail from your DSO. You’re just looking to adjust the colour here.
Step 4. SCNR – As I used a colour camera with the Optolong L-eXtreme filter, my image, and the stars in particular, has a green cast over it. SCNR will remove that green cast. Make sure the colour green is selected and then drag the triangle over to magically make your stars white again!
Step 5. Histogram Transformation – So hopefully you kept STF open, but if you didn’t it doesn’t matter, just open it up again. We need to drag the triangle from STF over to the histogram transformation screen. This tells the histogram transformation what has been applied and applies it to its own histogram. Now drag the histogram transformation triangle onto the image.
Your image will turn white and look a bit ridiculous – that’s okay! We essentially have 2 aggressive curve stretches applied to our image. All we need to do is turn off the STF preview by clicking the preview button in STF – it’s in the bottom right. That will make your image go back to its previous state, but now with the curve stretch applied. You can close STF now.
Step 6. Dynamic Background Extraction – DBE will extract the background, based on information we will input into it and remove gradient and noise – a really helpful tool! If all the options in DBE are greyed out, then just click on your image and some crosshairs should appear and the options within DBE should now be available.
We will be selecting options in the Target Image Correction section of DBE towards the bottom as follows:
- Correction – Subtraction
- Tick the Normalize box
Now that we have those options selected, we need to input some data to DBE so it has a model to use. To do that, simply click on your image LOTS of times to provide as much data as possible. Note that you only want to click on the background, so avoid clicking on stars and your DSO as much as possible. You want to take your time here for the best results possible. Be sure to compare your new image with your old image to see the difference. Once you’re happy, you can close DBE, the extracted background, and your original image. That should leave you with your new image which will have _DBE at the end of the name.
Step 7. Starnet – Now it’s time to remove the stars so we can work on just the DSO without bloating the stars. Starnet does an excellent job of doing this automatically.
Note – If you’ve never used PixInsight or Starnet before, then you may find that the 2 weights files are blank. The weights files are located in the folder that PixInsight is installed in. E.g. on my Windows PC the files are located in C:/Program Files/PixInsight/library.
Once you’ve selected the 2 weights files, ensure the Stride is set to 128 and tick the Star Mask box – this is really important! Without ticking this, Starnet will just remove the stars and you won’t have a mask to use to put them back in again. Once Starnet has finished running, you should be left with 2 files, one starless DSO image, and one star mask.
Step 8. Curves Transformation – Now we get to the exciting bit! Curves transformation is where all the magic happens to make your DSO pop. Once Curves Transformation is open, select the circle in the bottom left corner to open a real-time preview window. This will show you in real-time what your curve stretch will do to your image, without applying it to your original image.
For the first series of curve stretches, select the RGB tab. You want your curve stretch line to look like an S curve. Meaning that we move the upper part of the line up, and the lower part of the line down. This should make your DSO stand out more, but without blowing out the background.
The amount of curve stretches you apply, and how aggressive they are is entirely up to you and the quality of the image you’re processing. If you’re using my data, then I applied 4 RGB stretches. 2 which were reasonably aggressive and then 2 less aggressive.
Note: To apply a curve stretch, drag the triangle over to your image as per other processes. The real-time preview window will then apply the same curve stretch to the preview image unless you reset it. This can be a very helpful tool when applying multiple stretches but be careful not to overstretch your data. To reset the Curves Transformation window, simply click on the button in the bottom right.
Step 9. Curves Transformation continued (optional) – This is the stage when personal preference really comes into it. When processing my image, I wanted to bring out a little more of the red. You can do this by selecting the Red channel and applying a curve stretch. Or you may want to add more Hue or Saturation, again just select that tab in the Curves Transformation window and perform a stretch. Don’t forget to reset the window each time!
Step 10. EZ Denoise – You can find this in the Scrips Menu -> EZ Processing Suite -> EZ Denoise. If it’s not in your menu, then go back to the beginning of this blog post to follow the steps to install it – don’t worry, it’s free!
EZ Denoise is going to create a series of masks, isolating different types of noise in our image and then subtracting it from our original image. The result will give us a much cleaner, smoother background – it’s great if you’re using a noisy camera or have heavy light pollution.
When opening Denoise, ensure that you have your DSO image selected rather than your star mask. If your star mask was selected then simply select your DSO image by using the drop down to change it.
Leave all the settings as default and select the Run EZ Denoise button at the bottom.
Note – Depending on the performance of your PC, this can take a while to run (potentially up to 20 minutes). It’s pretty CPU and RAM intensive so now could be a good time to pop the kettle on! If EZ Denoise really struggled to run on your PC, then PixInsight does have a built in Denoise process called TGV Denoise which works perfectly well and shouldn’t impact your PC as much.
Step 11. Pixel Math – Now it’s time to add the stars back in. Pixel Math works on expressions, it’s a VERY powerful tool, but we’re going to keep it very simple here. I would advise at this point to rename your images to make the expression easier to write. I do the following, I call my starless DSO image “starless” and my star mask image “stars”. To rename an image, double click on the identifier tab on the image, or right click and select “Identifier”.
Now that you’ve renamed your images it’s time to write our very simple expression to add these 2 images together. We simply type “stars+starless” in the expression editor. Ensure that the Create New Image button is selected, as this means if something goes wrong we can simply discard our new image and we’re still left with our 2 original images. All other settings should be left as default.
Now you can click on the square icon to apply that expression. You should now have an image with the stars added back in, plus your 2 original files.
Step 12. Morphological Transformation – This is going to reduce our stars. Again, this is subject to personal preference. I don’t like my stars to be too dominant, nor do I like starless images. I leave the settings as default, but if that is too aggressive for you, or not aggressive enough, then you’ll want to adjust the Amount slider to your preference. I find that 0.8 works fine for most of my images.
Once you’ve adjusted the slider, drag the triangle over to your image to make the change. You can select the undo button if you’re not happy with the change.
Step 13. Unsharp Mask – Again, this is personal preference but I find the final image is a little soft for my liking. Unsharp Mask will sharpen the image for us.
I don’t like to be too aggressive here, stars shouldn’t be pinpoint and sharp, they should be a little fuzzy. You can adjust the amount of sharpening that’s applied by using the Amount slider again. Drag the triangle over to apply the change. You can also hit the Undo button if you’re not happy with it. I find that 0.6 works well for me and my preference.
You’re now ready to save your image and share it on social media! Congratulations if you made it this far, you’ve just processed your first image in PixInsight and no doubt have an excellent image to show off. If you used my data then please do tag me in it so that I can see your result.

Hey NIck
Great tutorial…thanks as always for your awesome comment…question….
Have you had any issues with loading your fits files into DSS? Im using the 533 and ASIAIR Plus and DSS won’t load the FITS giving me a can’t read error. Just curious if anything like this has ever happened to you.
Thanks!
Martin
Nick, why are you not using pixinsight to stack?
I think the admin of this web page is in fact
working hard for his web site, since here every stuff
is quality based material.
Nick –
Thank you very much for this understandable tutorial! I did have one question – can you create a similar tutorial showing how to take individual FITS files and stack them in Pixinsight? While I do have some TIFFs from my telescope, I had been grabbing the individual FITS files lately. Previously I took the easy way out and uploaded them to AstroCooker for stacking and processing, but of course that’s currently unavailable. Learning how to do the stacking in Pixinsight would definitely help.
Thanks!
Hi Steve, thanks very much! I’m planning on making a video about stacking FITs files in PixInsight. I’m hoping to get that out in the next couple of weeks.