The Skywatcher Star Adventurer Pro was my first step into using a tracking mount for astrophotography. In this post I will share with you my review and tips about using this mount.
The Star Adventurer is a portable tracking mount that will allow for long-exposure deep sky images to be taken with a telephoto lens or lightweight telescope. There are many of these tracking mounts available on the market, with the Sky-Watcher Star Adventurer being among the most popular, along with the iOptron Sky Guider Pro.
Tracking the sky is vital for long exposure astrophotography, meaning you’ll need an accurate polar alignment to get nice round stars in your images
Specs
· 7 tracking modes – solar, lunar, celestial, 0.5x, 2x, 6x & 12x
· Built in polar scope with separate illuminator
· Mini USB port for external power
· Battery power supply (4xAA)
· Payload capacity 5kg
· Auto-guiding port (RA tracking only)
In the box
· Star Adventurer Pro mount
· Ball head adapter
· Illuminated polar scope
· Dovetail L-bracket
· Equatorial wedge
· Counterweight shaft
· 1kg counterweight
As a beginner, the outlay of a reliable tracking mount, such as the HEQ5 can prevent people from getting into this hobby.
The great thing about a portable tracking mount is that they are a fraction of the price, and if you already own a DSLR camera and tripod then all you need is the Star Adventurer to go with it – making it the most affordable way to get into astrophotography.
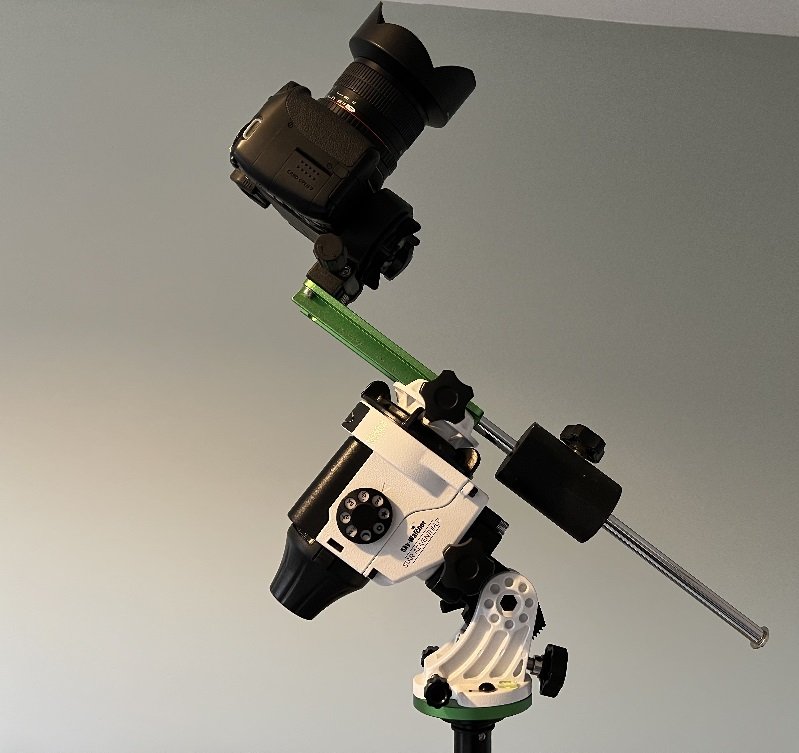
The Pro pack includes the equatorial wedge. The wedge is the piece that allows you to set your latitude and azimuth, without this you won’t be able to polar align. The Pro pack also includes the dovetail L-bracket and counterweight bar.
Using the L-bracket and counterweight is essential if using a small telescope to achieve balance and will also improve your images if using a telephoto lens. Essentially, the Pro pack is the one to buy for deep-sky astrophotography!
You can buy your Sky-Watcher Star Adventurer from FirstLightOptics HERE!
Sky-Watcher Star Adventurer Review
Equipment You’ll Need
Tripod – If you don’t already own a tripod then you will need to purchase one. Sky-Watcher have made a tripod for the Star Adventurer, which is very reasonably priced at £55. I don’t have experience of this tripod myself, but you’ll struggle to find a sturdy tripod that can match this price.
I didn’t buy this tripod due to its payload capacity of 3kg, the Star Adventurer itself weighs 1kg plus a 1kg counterweight. By the time you add your DSLR camera with lens you’ve maxed out the payload capacity of the tripod.
That being said, there are positive reviews for this mount online and plenty of people are using it.
The tripod I use is the Manfrotto Element Big Traveller, which you can buy here. The great thing about this mount is that it comes with a very sturdy ball head, which you can mount on directly on to the Star Adventurer with the ball head adapter for wide-field Milky Way shots.
The payload capacity for this mount is 8kg, which should be more than you’ll ever need as the Star Adventurer payload capacity is 5kg.
Shutter release cable – There are lots of third-party versions of these available for less than £15, the one I bought can be found here. A shutter release cable will allow you to take longer exposures, and control the amount of exposures you take, including the time between each exposure.
For example, you can take 50x 120 second exposures, with a 60 gap between each exposure. The camera itself will not give you these settings. Using a shutter release cable also avoids adding vibration on to your mount by pressing the shutter button on the camera. Just make sure the one you buy works for your camera.
The Good
The Skywatcher Star Adventurer is a fantastic product overall. For little expense (in astrophotography terms), you can unlock the deep sky in a way that is accessible to most people. Astrophotography can be prohibitively expensive, with the cheapest recommended mount being nearly £1000 on its own.
The Star Adventurer, at less than £300, is a price that most can afford, which is why there are now so many portable tracking mounts on the market, and why they’re so popular!
Of course, it’s fine being cheap but does it actually work? Yes! With an accurate polar alignment, I have achieved 2-minute exposures without auto-guiding at 200mm, and I know others have achieved more than this.
Checkout the Star Adventurer thread on Stargazers Lounge here for examples of incredible images and prove what’s possible with modest kit. Warning – it’s addictive!
The best thing about portable tracking mounts is the lack of additional kit you need. If you’re already a photographer with a DSLR and tripod then you’re good to go! If you do need a camera, then I recommend picking one up second hand from Camera Jungle.
Or, if you want a modified DSLR camera, which is more sensitive to Hydrogen Alpha (red wavelength) then I recommend Cheap Astrophotography.
Using AA batteries as a power source makes this mount truly portable, just remember to pack spares! If you’re at home or have a portable power source then you can connect a mini USB cable to the mount to power it this way.
At home I generally use my portable power pack to save my battery usage for when I need it. For me this is a huge advantage over other mounts like the iOptron Skyguider Pro which has a rechargeable Li-Ion built-in meaning you need to remember to charge it after each use.
The Not So Good
There are a couple of areas that could be improved on the Star Adventurer, luckily they’re not major issues.
The polar scope cover – Sadly, this cover is plastic and clips in to place. I find it a little tricky to get back on without the risk of moving the mount. A screw thread cover would’ve been a better finish but to get round the risk of the mount moving I just tend to leave the cap off for my imaging session.
The battery cover – The battery cover being plastic is not actually the issue here. The issue is that taking the battery cover off also has a tendency to knock the polar scope cover off as well, which is mildly annoying.
Polar scope illuminator – This is a separate light and not built-in to the mount like it is in other mounts. The main issue with this is that it is very easily lost due to how small it is, you also can’t have the dovetail L-bracket attached to the mount while polar aligning, as the light slots in to the polar scope so you’ll have to add your equipment after aligning.
Tip: A way round this is to polar align at twilight so that you don’t need the polar scope illuminator. See my polar alignment tutorial for more info.
Finding Objects in the Sky
The Star Adventurer does not come with a “go-to” capability, meaning you’ll need to find objects yourself. This can be tricky at first for a beginner but learning the night sky and star hopping is a learning process that every amateur astrophotographer should go through.
It’s a very rewarding process if a little frustrating at first, and you’ll thank yourself for it long term.
Luckily, targets such as the Orion Nebula M42 are visible to the naked eye and can be framed up very easily by using the live view on your camera. Using bright targets is also a nice way to focus your lens rather than taking a lot of images and making small adjustments each time.
The difficulty can come in when finding a target that you can’t see.
The way I do this is to use a star finder app on my phone, or Stellarium on my laptop. Once you find your target, aim your camera or telescope at the nearest bright star. If you’re using a telephoto lens, then you can make this process easier by zooming out to give you the widest field of view.
Take a 30 second exposure while pointing at your chosen star, if your target is within the field of view then great, make some fine adjustments to centre it in the frame and your imaging can begin! If your target is not yet in your field of view, refer back to your app and check its position in relation to the star.
Make some fine adjustments to where it should be in the sky, take another 30 second exposure and keep making fine adjustments until it’s in the centre of your frame.
Auto Guiding
The Star Adventurer has a port for auto guiding. I haven’t used this function myself for two reasons. 1. I don’t have a guide scope & guide camera, and 2. the Star Adventurer can only guide in Right Ascension (RA).
There are plenty of people who are successfully guiding with the Star Adventurer and if it was my only imaging rig then I would certainly invest in autoguiding equipment, I was actually looking at autoguiding options before I stumbled across a second hand HEQ5 on SGL which has now blown my budget.
When I do finally invest in autoguiding equipment then I will save it for use with my 72ED and HEQ5, however.
A Quick Word on the Star Adventurer Mini (SAM)
The Star Adventurer Mini is the younger sibling of the Star Adventurer Pro. The SAM is even more lightweight than the Pro and is the ideal choice if you’re looking to shoot widefield landscape foreground shots with the Milky Way.
The SAM’s selling point is that it’s the most portable of all portable trackers, weighing in at 650g and dimensions of 76x70x103mm means it will fit in your bag without you even noticing it’s there, ideal for taking on a night time hike to a dark sky location.
The SAM also has WiFi capability, which the Pro does not, meaning you can fully control the SAM from your phone by downloading the SAM Console app, something I wish I could do with the Pro!
The SAM is powered by 2x AA batteries or mini USB cable and you should get approximately 72 hours of imaging time out of your batteries, though I always recommend carrying a spare set.
The SAM is really designed to be used with lenses of 55mm or shorter focal length, due to its payload capacity of 3kg. This means you only need a rough polar alignment as at such a wide focal length you won’t see star trails until you reach much longer exposures, perfect for beginners.
If however, you want to use longer focal length lenses or a small telescope such as the 72ED or William Optics RedCat/SpaceCat, then you will need the Pro pack. But take nothing away from the SAM, it is a very capable mount for widefield imaging and its compactness will appeal to a lot of people.
Both the SAM and Pro come with detailed instruction manuals which take you through how to set up your mount, its different configurations and how to polar align. You can also view these manuals as PDFs online.
Summary
You will struggle to find a better way to get into the world of astrophotography than the Sky-Watcher Star Adventurer. It’s portability, price and ease of use make it the perfect choice for those who are either beginners wanting to get into the hobby, or more experienced hands who don’t want or are unable to take their full imaging rig to remote locations.
The Star Adventurer does have some minor flaws but that in no way takes away from how capable and well-built it is overall. It is my go to imaging kit due to how quick and easy it is to set up, I can assemble and polar align the Star Adventurer in less than 10 minutes, compared to about an hour with my HEQ5.
If you’re a beginner looking to get into this hobby and don’t want the outlay of a go-to mount, telescope, power supplies etc then the Star Adventurer is for you. I cannot recommend this product enough.
