The Rosette Nebula is an incredibly beautiful, and popular, deep sky astrophotography target. At its centre, is the open star cluster NGC2244, which is a handy guide to let you know you have the Rosette Nebula in the centre of the frame when imaging.
The Rosette Nebula is sometimes referred to as the Skull Nebula, as looking at it in a different orientation makes it appear as a skull rather than a rosette. It’s one of my favourite winter astrophotography targets that I return to year after year.
As an emission nebula, the Rosette looks incredible either as a red rosette when imaged in RGB, or in the infamous SHO palette, which is definitely my favourite on this particular target. However, to image in the SHO palette you need a mono camera with SHO filters, or an RGB camera with a narrowband filter and some magic in PixInsight!
However you image it, you will never forget the first time you process an image of the Rosette Nebula, there’s a reason many, including me, return to it year after year.
Rosette Nebula
Designation: Caldwell 49
Location: Monoceros Constellation
Object Type: Emission nebula
Notable Features: Multipart nebula
Distance from Earth: 5200 light years
Object Size: 130 light years diameter
Magnitude: 9.0
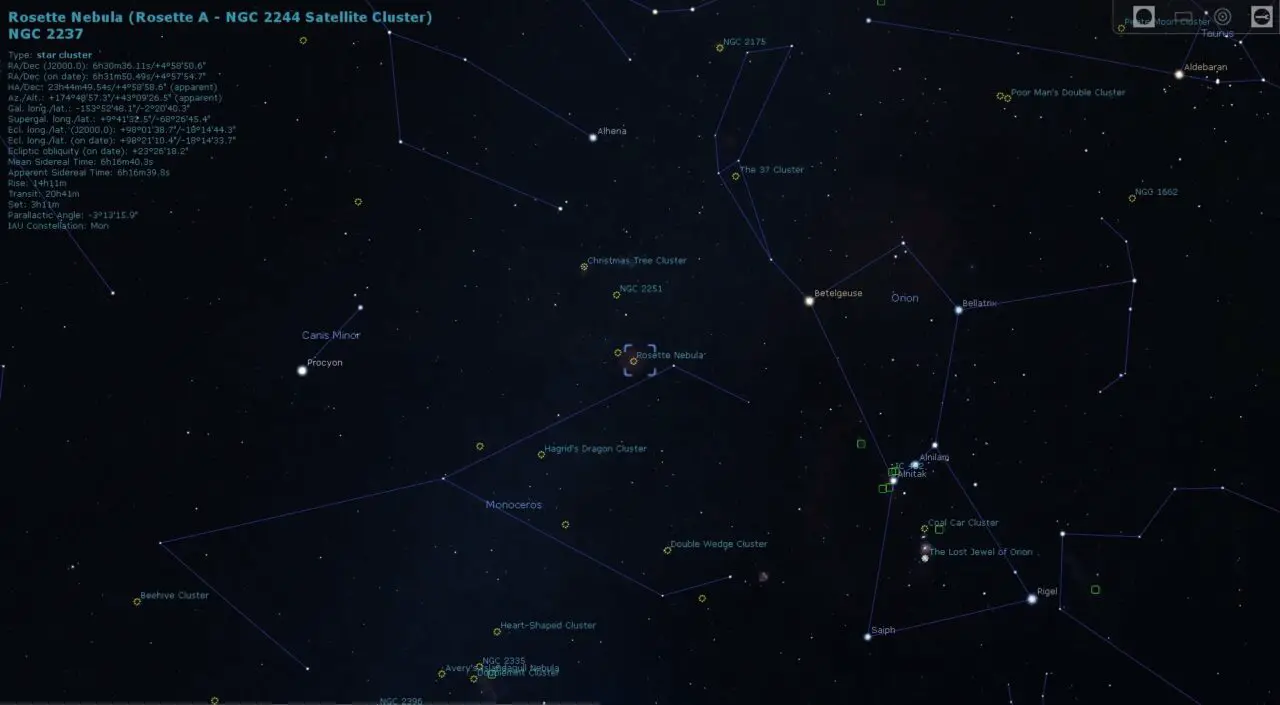
Location and How to Find
The Rosette Nebula is located in the constellation of Monoceros, neighbouring the more famous constellation of Orion. If you locate the bright star Betelgeuse in the Orion constellation, then the Rosette Nebula is located just South West of it.
This makes it a really easy target to find if you’re not using a go-to mount and need to find targets manually. Particularly if you’re using a camera lens rather than a telescope, that nice wide field of view will mean locating the Rosette Nebula is no problem at all. Just point your imaging gear slightly to the left of Orion and the Rosette should pop into the FOV.
It can be quite a dim target if taking shorter exposures, i.e. less than 2 minutes, but the star cluster NGC2244 at the nebula’s centre distinguish it quite nicely so you can feel confident that you’ve found your target.
Astrophotography
Once you’ve got the Rosette Nebula framed up correctly, you’ll want to ensure you’re using the optimal settings for imaging. These are the settings that I use for my DSLR and dedicated astronomy camera. Your settings may vary dependent upon a number of factors such as light pollution, but this will give you a good start and only minor adjustments should be required if any at all.
DSLR Settings
- Camera Manual mode
- ISO 800
- Exposure 2 minutes (or longer if autoguiding)
- White balance Daylight
Again, depending on your setup, you may find that 2 minute exposures are the longest you can do without adding autoguiding to your setup. Or, you may find that you can’t quite go 2 minutes if your focal length is longer than what I used for my images. My focal length was 537mm to give you an idea.
The best way to check if your exposures are too long, is to zoom in on your individual subs and check for egg shaped stars. If the stars have started to elongate and look a bit egg shaped, your exposures are too long and you’ll need to dial it back a bit.
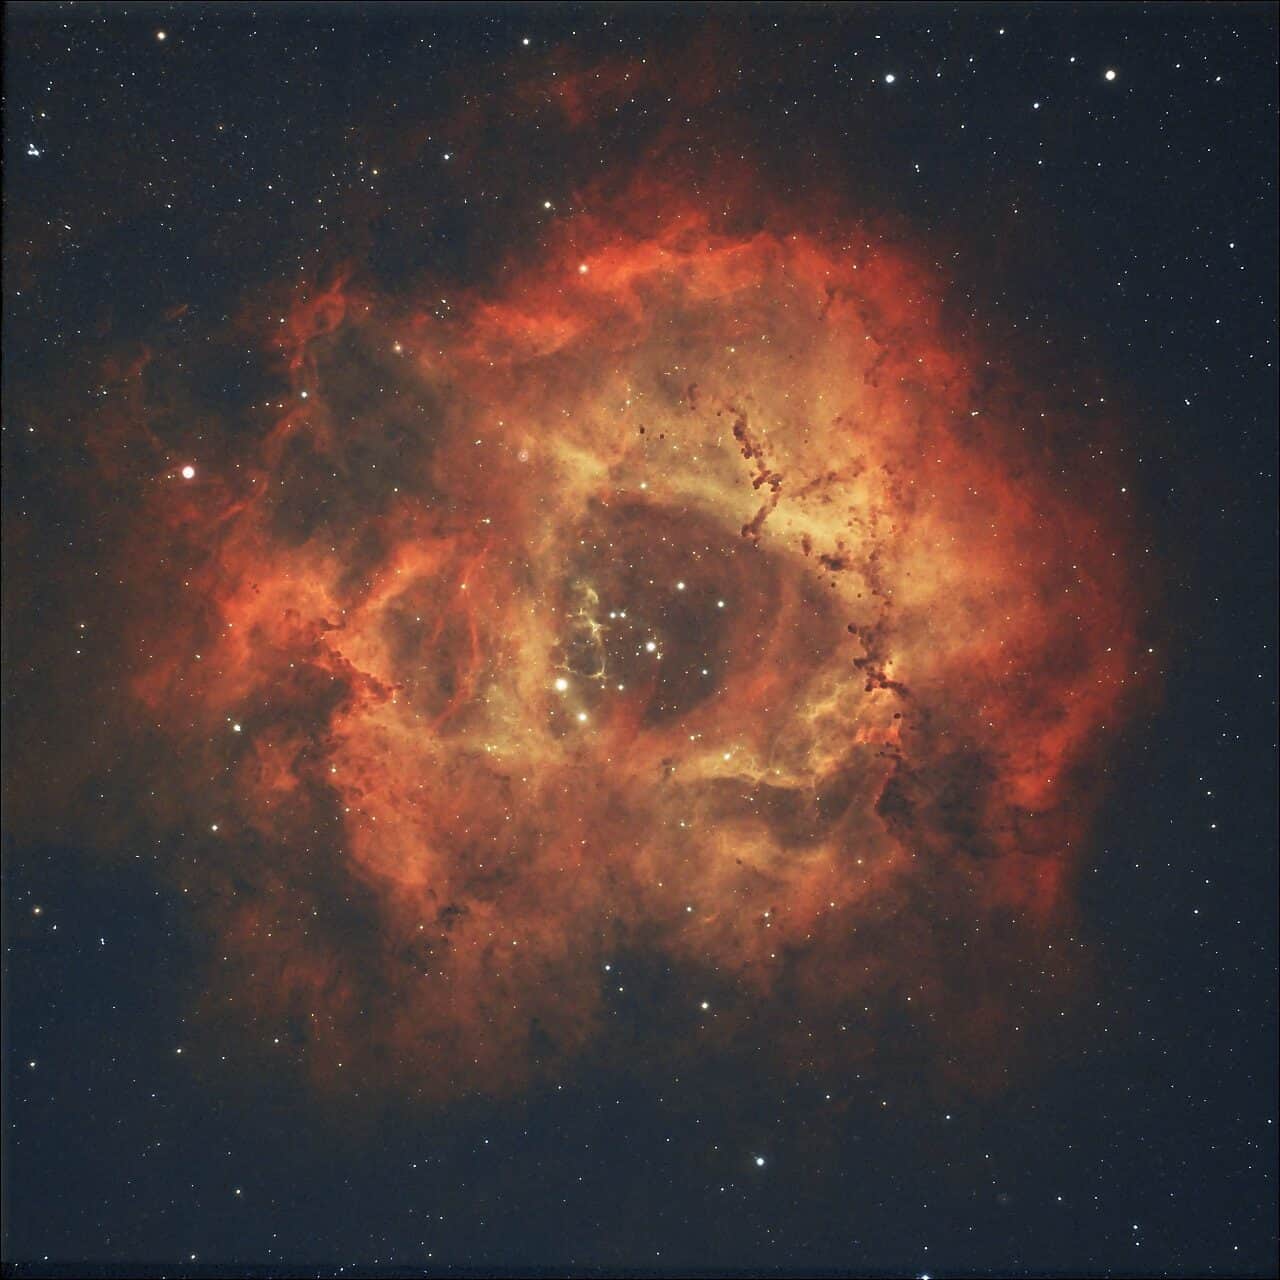
This image was the first that I took of the Rosette Nebula using an astro-modified DSLR. It’s not exactly Hubble quality, but it does show what can be captured using a modest astrophotography setup.
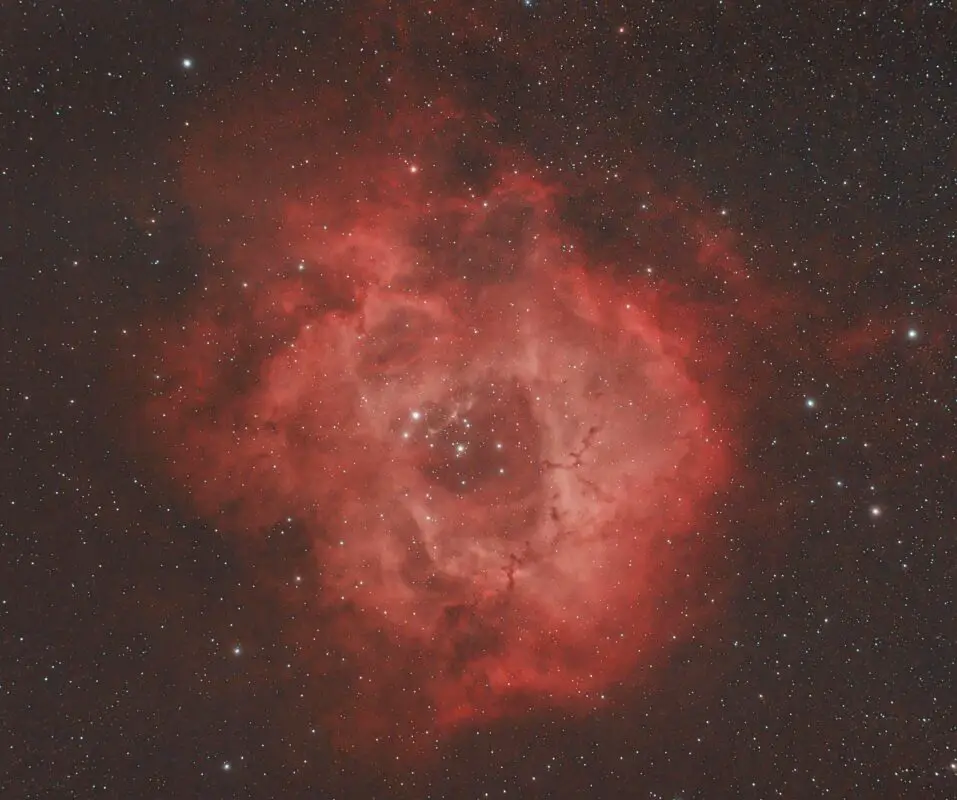
To capture this image I used the following:
· Telescope Sky-Watcher Evostar 72ED with 0.8x reducer/flattener
· Camera Canon 650D astro-modified
· Mount Sky-Watcher HEQ5 Pro with belt mod
· Filter Optolong L-eNhance
The final image is comprised of:
- 60x 2 minute exposures
- ISO800
- 30 flat frames
- 50 bias frames
- Stacked in DeepSkyStacker
- Processed in Photoshop
The above image is only cropped slightly, just to give the majority of the frame over to the Rosette. As you can see, it’s a nice tight field of view but doesn’t crop the nebula at all. The telescope I used was the Sky-Watcher Evostar 72ED DS-Pro and you can read my full review of this telescope here.
Astronomy Camera Settings
Dedicated astronomy cameras are a completely different beast entirely. I won’t go into the full details of how they work in this post, but if you want some more information and my full review of the camera I use, then I have a whole post where I reviewed the ZWO ASI 533MC Pro.
- Gain: 100. This is Unity Gain for my camera, which I would always recommend using.
- Offset: 30. This setting works well for my sky conditions and the filters I use. I recommend starting here but you may need to increase it to 40 or 50 depending on your conditions.
- Temperature: I often image at -10C, or if it’s really cold -15C. The lower the temperature the better but anything below 0C will be fine. Hot sensors are noisier, so getting down to a minimum of -5C is ideal.
- Exposure Time: 3 minute exposures.
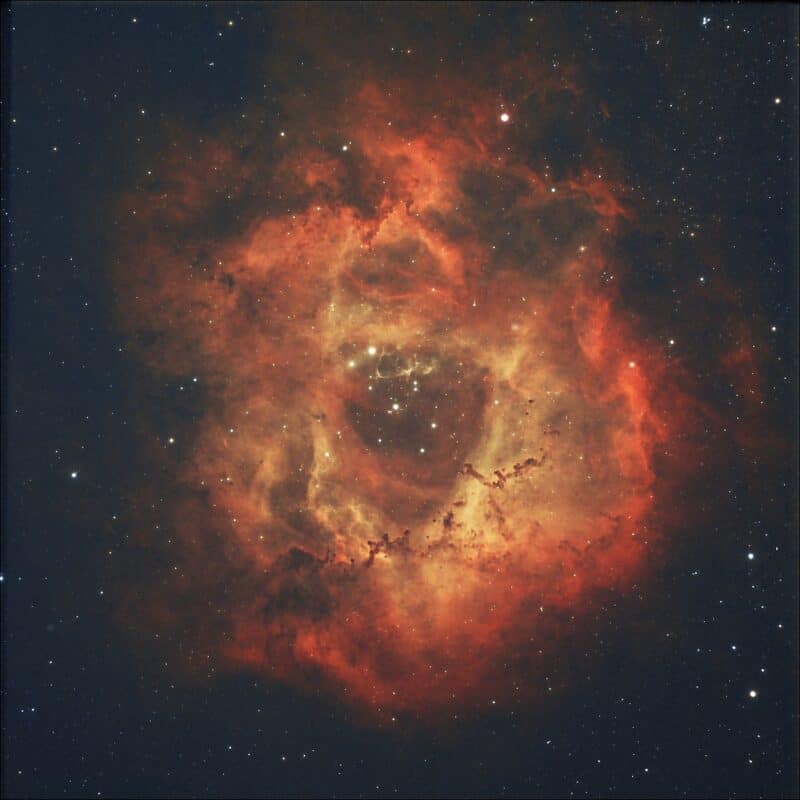
Image Details:
Exposure Time: 6 hours
Gain: 100
Offset: 30
Temperature: -10C
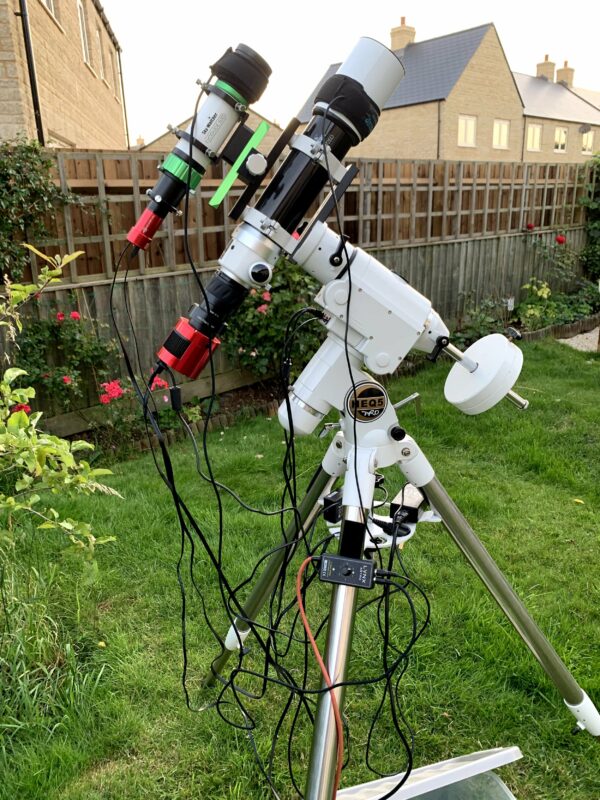
What Equipment to Use
Really, the answer to this question depends on what type of image you’re going for. It’s possible to capture such a widefield shot of the Orion constellation, that the Rosette Nebula actually fits into the FOV too!
Deep sky astrophotography brings such joy that it doesn’t matter if you’re using a wide-field camera setup, or a big telescope, you will be capturing the beauty of the night sky and there is something really special about that.
For an image like that includes the Orion constellation, you’re going to need a wide-angle lens and probably a full frame camera. Something like a 14mm lens with a full frame DSLR will give you the FOV required, but to check the correct FOV, you can use planetary software such as Stellarium and input your imaging equipment details into it, which will show you how the framing looks.
If you’re using the wide-field setup mentioned, then you’ll also be imaging the beautiful Orion constellation, which will provide immense depth to your images and also contain the following nebulae:
- Barnards Loop
- Horsehead Nebula
- Flame Nebula
- Running Man Nebula
- M78
If you’re using a longer focal length camera lens or telescope, then you’ll be imaging the Rosette Nebula in isolation, which is great! This is comfortably one of my favourite targets to image, which is why I return to it year after year.
Best Time to Observe
The Rosette Nebula is not visible to the naked eye, but that doesn’t mean you need really dark skies to image it. Thanks to the sensitivity of modern cameras, and light pollution or narrowband filters, you can image the Rosette Nebula from any location. Of course dark skies will always yield better results, but you certainly don’t need to drive for an hour into the countryside to get a good image. I live in a Bortle 4/5 area, so my skies are reasonably dark but I do all my imaging from home.
Monoceros, where the Rosette Nebula is located, is a winter constellation. Meaning the best time to observe this celestial beauty is from November through to March, when it starts to become too low in the sky to image – or at least that’s the case for my latitude in the UK. Over winter, the Rosette Nebula will be nice and high in the sky from about 7pm onwards and won’t set until the early hours, meaning you can image it all night. The imaging window will of course become shorter as we progress through winter.
Image Processing
As if taking astrophotography images isn’t hard enough, we then need to be able to edit them using post-processing software such as Adobe Photoshop or PixInsight. This can be tricky when it’s your first few times doing it, but I have some handy guides on my website and YouTube channel that go through the basics as a beginner.
Before we start with post-processing however, we need to stack all of our images using software such as DeepSkyStacker, which is free for Windows. By stacking our images, we’re improving our signal to noise ratio, meaning our final image will have more data and be less noisy than if we were just using a single image.
I did a video on my YouTube channel where I go through different exposure times and show the difference in noise and data and the results are very interesting. Every time you add more data, your final image will improve that bit more. There is, however, a point where diminishing returns occurs and actually adding more data is not providing much improvement to the final image, but if you’re only imaging over 1 or 2 nights, you certainly won’t reach that point.
Astrophotography Tips & Tricks
I’ve imaged the Rosette Nebula quite a number of times over the years, and in that time I have picked up some tips and tricks that will hopefully help you if you’re a beginner to astrophotography.
1. Use a narrowband filter, even if you have dark skies. My skies are fairly dark, but a narrowband filter still has its uses. By isolating the wavelengths of emission nebulae, you’re blocking out any potential light pollution in your local area and only collecting photons on the wavelengths that you actually want. This is also particularly helpful when using a filter like the Optolong L-eXtreme, as even a full moon is mostly, but not fully, blocked by this filter. I used to avoid doing deep sky astrophotography during full moon, but not anymore!
2. Add a hydrogen alpha filter to your setup. Remember my previous point about a full moon stopping deep sky astrophotography? Well Hydrogen alpha (Ha) is in the red part of the visible light spectrum at 656nm. By using a Ha filter, you’re only collecting data that is specific to emission nebulae, which is perfect for this target. This will create a black and white image on its own, but you can also blend the Ha image as a luminosity layer to your RGB image to add even more stunning detail!
3. Start autoguiding if you aren’t already. Honestly, autoguiding is such a game changer in astrophotography because you’re no longer limited to shorter exposures. I’ve used 10-minute exposures when autoguiding and the stars are pinpoint every time. This obviously adds an additional cost to your setup, plus the complexity of connecting autoguiding software, but the results will improve your images 10-fold, trust me. I use the Sky-Watcher EvoGuide 50ED and ZWO ASI 120mm Mini, and I have a full review on my website to check out.
Interesting Facts
- It can be viewed as either a rosette or skull depending on orientation.
- It is located approximately 5000 light years from Earth.
- The mass of the nebula is estimated to be around 10,000 solar masses.
- Radiation from the young stars excites the atoms in the nebula, causing them to emit radiation themselves, which is what we’re seeing in the nebula.
Final Thoughts
Whether you’re using a camera lens or telescope, it’s clear that the Rosette Nebula is a fascinating deep sky object to image. I love looking at the nebulosity, I often zoom in to my final image of the Rosette and just admire the detail for a little while. I never get tired of looking at it!
If you’ve never imaged the Rosette Nebula before, then you will definitely want to next time you have a clear night! Or if you’re a seasoned pro imaging it for the tenth time, I’m sure you’ll find just as much delight in it each year as I do.
The Rosette Nebula is a perfect target for beginners to start with as it’s relatively easy to find and it’s an easy target to process. I also have a guide for my top 5 deep sky astrophotography targets for winter, and a separate list that is focused just on beginners to get you started.

Hi
I like your website. Have You Considered Selling? I would propose x25 of your monthly earnings.
Thank you
Best Regards
Dennis Demchyna
https://www.facebook.com/profile.php?id=100077635508369