Astroberry is a great way to take your astrophotography imaging to the next level, without spending too much money. The ASI Air Pro, for example, can cost 3x the amount that buying the gear for Astroberry would cost.
You don’t need to be a deep technical expert to get started with Astroberry, but there are some setup steps that you will need to do to get everything working. In this guide, I will walk you through how to download and install Astroberry step-by-step.
What Equipment You’ll Need
Minimum Requirements
To run Astroberry, you will require the following as a minimum:
- Raspberry Pi 3, but a Pi 4 is recommended
- Micro SD Card 16GB, but 32GB is recommended
- Laptop/PC with an internet connection for initial download/installation and for remote desktop to the Pi
Raspberry Pi
Astroberry will work on a Raspberry Pi 3, but it’s recommended to use a Raspberry Pi 4 as the minimum. There are 3 types of Rapsberry Pi 4 available, the 2GB, 4GB & 8GB. I would recommend a minimum of 4GB, as the 2GB version will start to lag quite significantly once you start the imaging software.
I have the 4GB version and have found that to be fine, it regularly uses 2GB of RAM, which is why I wouldn’t recommend that 2GB version. 8GB is probably slightly overkill for this use, but I have occasionally found my Pi to be a little sluggish so if you can afford the 8GB version then that’s a safe bet.
You can buy a Raspberry Pi 4 from lots of places, but here’s a link to where I bought mine from. The great thing about using the official website is that you know you’re buying the official product, and you can select your country to find the best retailers.
Micro SD Card
Not all Micro SD cards are made equally. I use the SanDisk Extreme 32GB and have found this to work extremely well. The faster write speed means that when my images are saving during an imaging session, the files are being written to the card much faster, which frees up computing capacity to run the imaging software.
The minimum requirement for a micro SD card is 16GB, but a 32GB card is recommended, which is what I use. The Astroberry OS will take up approximately 8GB on your SD card, so giving yourself the extra space with a 32GB card will mean you won’t run out of space during an imaging session.
However, if you’re saving your imaging files straight to an external hard drive, then the size of the SD card becomes less important, but a minimum 16GB is still required.
How to Download Astroberry
Downloading Astroberry is a simple process, but there are also other things we need to download at the same time to prepare for the installation process.
- Step 1: Visit astroberry.io and navigate to the Downloads page. Click on the Download button to begin downloding the ZIP file.
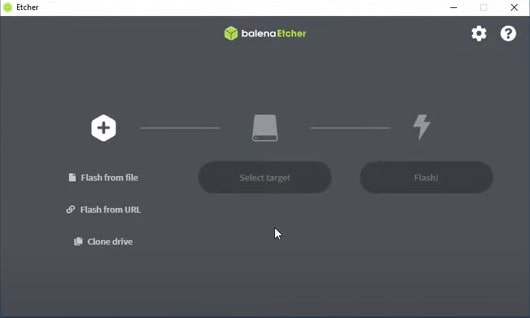
- Step 2: Download etcher.io to flash your SD card. Flashing the SD card is a necessary step to allow us to install the Astroberry OS on to the card. etcher.io is available for free for Windows, Mac and Linux.
How to Install Astroberry
Step 1: Extract the Astroberry ZIP file by right clicking on the download file and selecting Extract All.
Step 2: Open etcher.io and flash the SD card by doing the following:
- Select Flash from File and select the Astroberry.img file
- Select the Target, which is the micro SD card you will be installing the file onto. Now is the time to insert your SD card into your laptop/PC if you haven’t already.
- Select Flash to flash your SD card. This will take a few minutes to run.
Note: Flashing is the process by which the operating system is installed onto the SD card, you can’t just copy and paste a .img file onto the card as that won’t install the file.
Step 3: Safely remove the SD card from your PC and insert it into your Raspberry Pi
Step 4: Turn on your Raspberry Pi. The initial boot may take a couple of minutes to complete
Step 5: On your PC, click on the WiFi icon and select Astroberry, and type in the password astroberry (all lower case). This will connect to the Raspberry Pi hotspot, which will allow you to remote desktop into the Raspberry Pi from your PC.
Step 6: Once connected, open up a tab in your web browser and connect to the Raspberry Pi by typing either https://astroberry.local or 10.42.0.1. You may get an error saying your connection is not private, just click on proceed.
Step 7: You should now see the Astroberry landing page (see below). Click on Start to go to the login page.
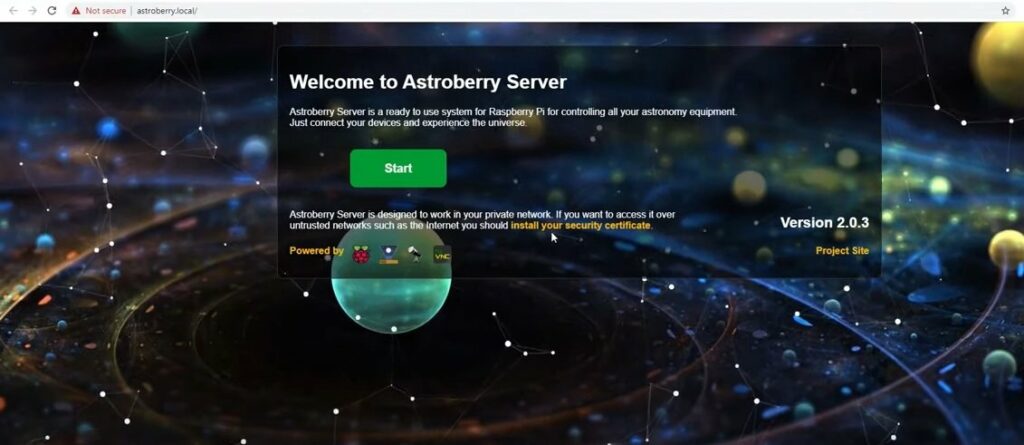
Step 8: Click on Connect and type the password astroberry (all lower case). You should now be logged in and seeing the Astroberry desktop.
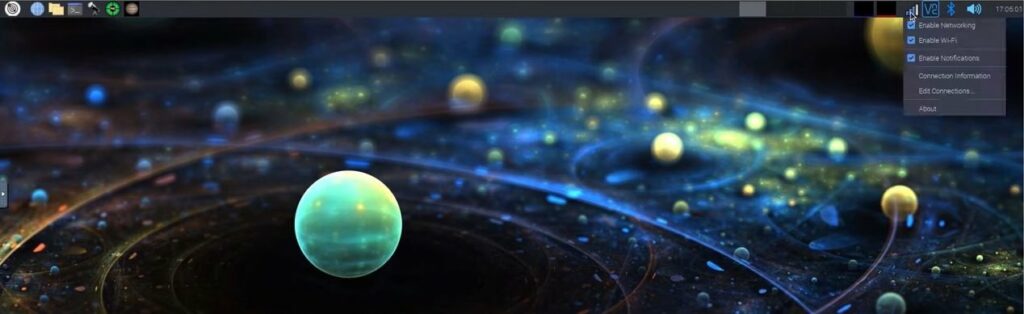
Step 9: Now you need to connect Astroberry to your home WiFi so we can download updates. To do this:
- Right click on the signal symbol on the top right of the screen, just next to the clock, and select Edit Connections. (see image above)
- Select the + icon to add a new connection.
- Select the connection type appropriate to you, I connect using WiFi but if you have a wired connection then select Ethernet and select Create.
- Type in a name for your connection (it can be whatever you want)
- Fill out the SSID field. This is the name of your home broadband connection.
- Select the tab WiFi Security and select the appropriate dropdown option, in most cases this will be WPA2 Personal.
- Type in your password. You can get this from the back of your router if you have never changed it.
- Select the tab IPv4 settings and check that Automatic (DHCP) is selected.
- Click save.
- Left click on the signal symbol again to check that you’re connected to your home WiFi.
Step 10: Back on your PC, disconnect from the Astroberry hotspot and connect back to your home WiFi. You may get disconnected from the Raspberry Pi when this happens. Just refresh the browser tab and login again.
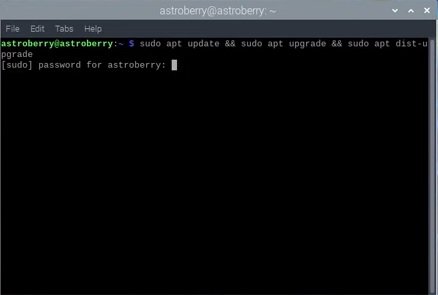
Step 11: Check for updates
- Open up Terminal by selecting it from the menu bar on the top left, it’s the one between the folder and telescope icons. Alternatively, right click on the desktop and select Open Terminal
- Type the following command: sudo apt upgrade && sudo apt dist-upgrade
- Press return
- Type in the sudo password, which is astroberry (all lower case)
This will update and upgrade the operating system and the software within it to the latest versions available.
Once the updates have been completed, Astroberry is ready to go! If you need help with navigating the software and setting up the right drivers for your gear, then I have another handy video guide below.
Tips
When purchasing your Raspberry Pi, there are a couple of things to note. When you’re buying a Raspberry Pi, you are only buying the physical Pi circuit board and nothing else, unless you’re purchasing a specific bundle. That means you also need to purchase the following:
- A power supply. You don’t have to buy the specific Raspberry Pi power supply, any USB-C cable with your country’s plug on the end will work.
- You will need to buy a case. There are lots of reports out there that the Pi 4 overheats, but bear in mind that for astrophotography use, it’s going to be outside. You may wish to purchase a more robust, weather proof case for your Pi, but I purchased the standard case and have been using this for 3 years with no issues in the UK. I find that our cold, damp climate actually helps as the heat from the Pi prevents any dew build up but the Pi is kept cool enough. You will need to consider your own climate for what will work best for you.

Hi Nick
Very lucid explanation on Astroberry setup. Enjoyed it and got my Astroberry running in a short time. Thank you for your efforts in putting together this write up and videos.
Thanks very much!